Fusion de courriers Many-to-One : Combiner des lignes en un seul email
Envoie un email par destinataire en combinant plusieurs lignes de tableau en un seul. Voici comment configurer un publipostage plusieurs-à-un dans Outlook.
Contents
Disponible en tant que tutoriel vidéo

Étape 1. Assure-toi que la colonne “À” dans ta feuille de calcul est identique pour toutes les lignes que tu souhaites regrouper.
Ajoute une colonne à ta feuille de calcul appelée “Pièces jointes”. Ajoute les noms des fichiers dans la cellule pour chaque destinataire. Tu peux ajouter plusieurs fichiers en les séparant par un point-virgule.

Étape 2. Démarre un publipostage et télécharge ta feuille de calcul
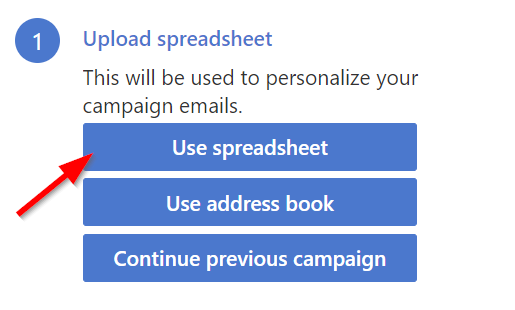
En supposant que tu as installé SecureMailMerge et que tu as démarré le plugin depuis le menu Apps, tu verras l’écran suivant. Clique sur le bouton “Télécharger la feuille de calcul” et sélectionne ton fichier de feuille de calcul depuis ton disque dur.
Étape 3. Active le mode “many-to-one”
S’il y a plusieurs lignes dans ta feuille de calcul avec le même destinataire d’email, un message apparaîtra te demandant si tu souhaites envoyer un publipostage traditionnel ou un publipostage many-to-one.
En mode publipostage traditionnel, chaque ligne sera envoyée en tant qu’email séparé. En mode many-to-one, toutes les lignes avec le même destinataire d’email seront regroupées et envoyées en un seul email.
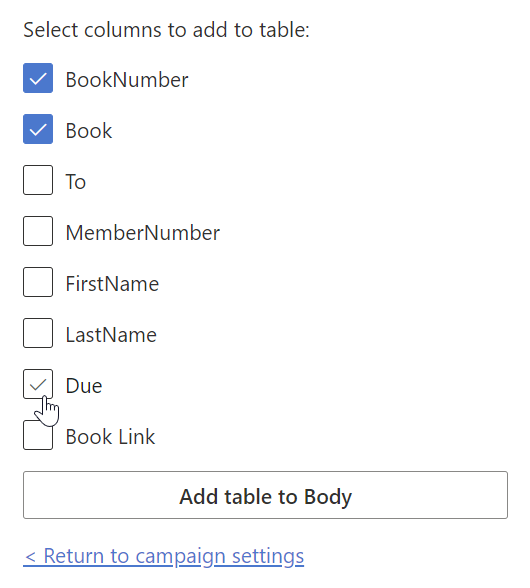
Passe au mode many-to-one et un bouton apparaîtra plus bas te permettant d’ajouter un tableau à ton publipostage.
Si tu insères plutôt un jeton de personnalisation régulier (en mode many-to-one) au lieu d’un tableau many-to-one, alors les valeurs de toutes les lignes seront insérées en un long texte séparé par des virgules, sauf pour les colonnes spéciales “Pièces jointes”, “CC” et “BCC” qui seront combinées intelligemment (voir la section suivante).

Remarque spéciale : Combinaison des pièces jointes, CC et BCC sur plusieurs lignes
Lors de l’utilisation du mode many-to-one, SecureMailMerge combine intelligemment certaines colonnes de toutes les lignes appartenant au même destinataire :
- Pièces jointes : Toutes les pièces jointes uniques de chaque ligne sont combinées en un seul email
- Destinataires CC : Tous les adresses email CC uniques sont fusionnées
- Destinataires BCC : Tous les adresses email BCC uniques sont fusionnées
Cela signifie que tu peux organiser ta feuille de calcul avec plusieurs lignes par destinataire, chacune contenant différentes pièces jointes ou destinataires CC/BCC, et SecureMailMerge les combinera automatiquement.
Exemple : Plusieurs pièces jointes par destinataire
| À                  | Pièces jointes       | CC              |
|--------------------|----------------------|-----------------|
| [email protected]    | contrat.pdf          | [email protected]  |
| [email protected]    | facture.pdf          | [email protected]|
| [email protected]    | conditions.pdf       |                 |
Résultat : John reçoit un email avec les trois pièces jointes (contrat.pdf, facture.pdf, conditions.pdf) et les deux destinataires CC ([email protected], [email protected]).
Dé-duplication automatique : Si la même pièce jointe ou adresse email apparaît dans plusieurs lignes, elle ne sera incluse qu’une seule fois dans l’email final.
Par défaut, le mode many-to-one n’est proposé que lorsque des adresses email de destinataires en double sont détectées dans ta feuille de calcul. Cependant, tu peux forcer l’activation du mode tableau many-to-one depuis les Options avancées, même lorsque tous les destinataires sont uniques.
C’est utile lorsque tu souhaites utiliser le {% table %} tag pour rendre les lignes de la feuille de calcul sous forme de tableau dans chaque email, peu importe s’il y a des destinataires en double. Dans ce cas, chaque email contiendra un tableau avec une seule ligne de données de la feuille de calcul, mais tu peux toujours profiter des puissantes fonctionnalités de rendu de tableau pour formater tes emails de manière agréable.
Étape 4. Envoie un email de test puis envoie la campagne
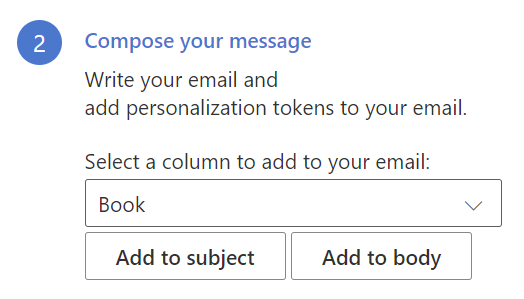
Tu peux ensuite procéder en envoyant un email de test, pour vérifier que tes jetons de personnalisation fonctionnent comme prévu.
Note que la première ligne du tableau sera utilisée pour l’email de test, donc tu ne verras les fonctionnalités plusieurs-à-un que si ce destinataire a plusieurs lignes assignées.
Quand tu es satisfait, tu peux envoyer la campagne à tous les destinataires.
Ready to try it yourself?
SecureMailMerge for Outlook
Runs inside Outlook — no external app needed. Free to install.
Free · No credit card required